Overview
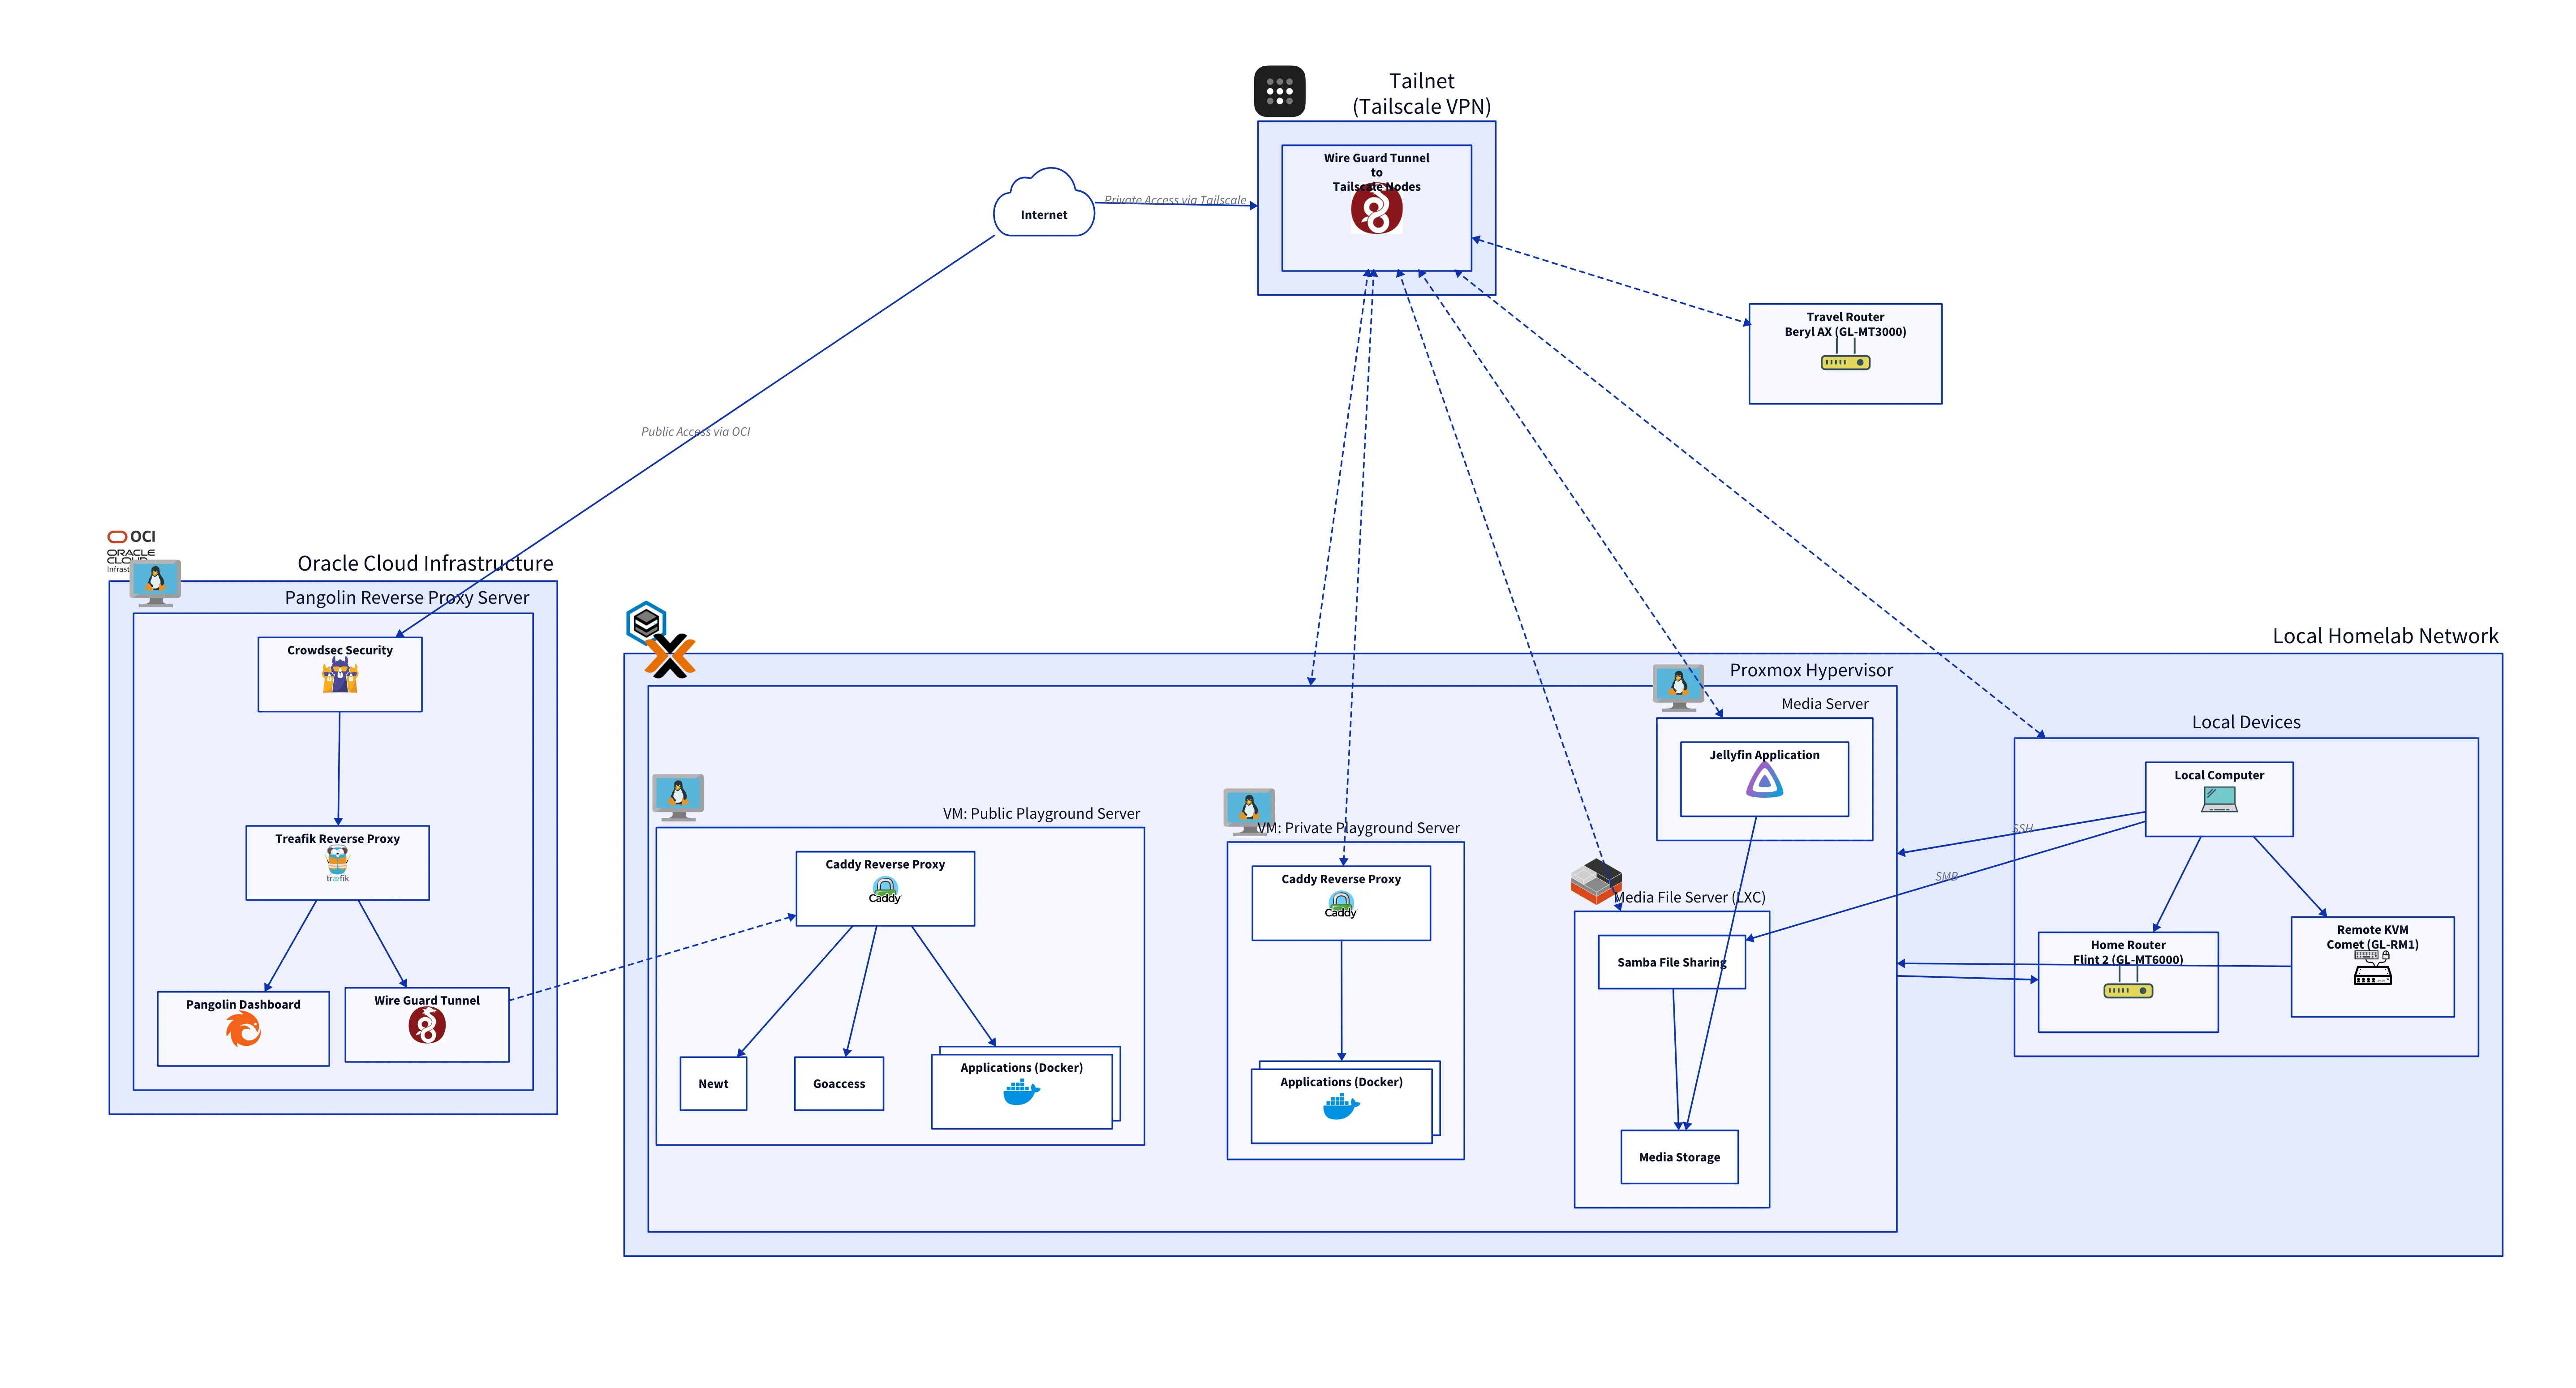
This project represents my personal homelab infrastructure, built on Proxmox VE. It is designed to be fully reproducible and manageable through code, leveraging Terraform for infrastructure provisioning and Ansible for configuration management.
The goal is to create a robust, self-healing environment that hosts various services while serving as a playground for experimenting with DevOps practices.
Here’s a high-level overview of the overall architecture:
Tech Stack
| Technology | Description |
|---|---|
| Proxmox VE | Homelab hypervisor for running VMs and Containers. |
| Terraform | Infrastructure as Code tool used to provision VMs and LXC containers. |
| Cloud-Init | Industry standard for early initialization of cloud instances (Ubuntu Server). |
| Ansible | Configuration management tool for automating software installation and configuration. |
| Ubuntu Server | The base operating system for all Virtual Machines and LXC containers. |
| Docker | Platform for developing, shipping, and running applications in containers. |
| Tailscale | Zero config VPN for secure private networking between devices. |
| OCI | Oracle Cloud Infrastructure. Used as a public entry point for homelab services. |
| Cloudflare | DNS management for deployed services. |
| Traefik | The edge router handling SSL termination and traffic routing on CloudVM. |
| Caddy | Local reverse proxy for internal routing and service discovery. |
| Pangolin | Identity-aware access control and tunnel management. |
| CrowdSec | Collaborative Intrusion Prevention System (IPS) for threat detection. |
Core Principles
Immutable Infrastructure
The homelab is built on the principle of Immutable Infrastructure. This means that once a server (VM or Container) is deployed, it is never modified manually. If a configuration change is needed, the infrastructure code (Terraform/Ansible) is updated, and the resource is either re-provisioned or re-configured automatically. This eliminates “configuration drift” where servers become unique “snowflakes” over time.
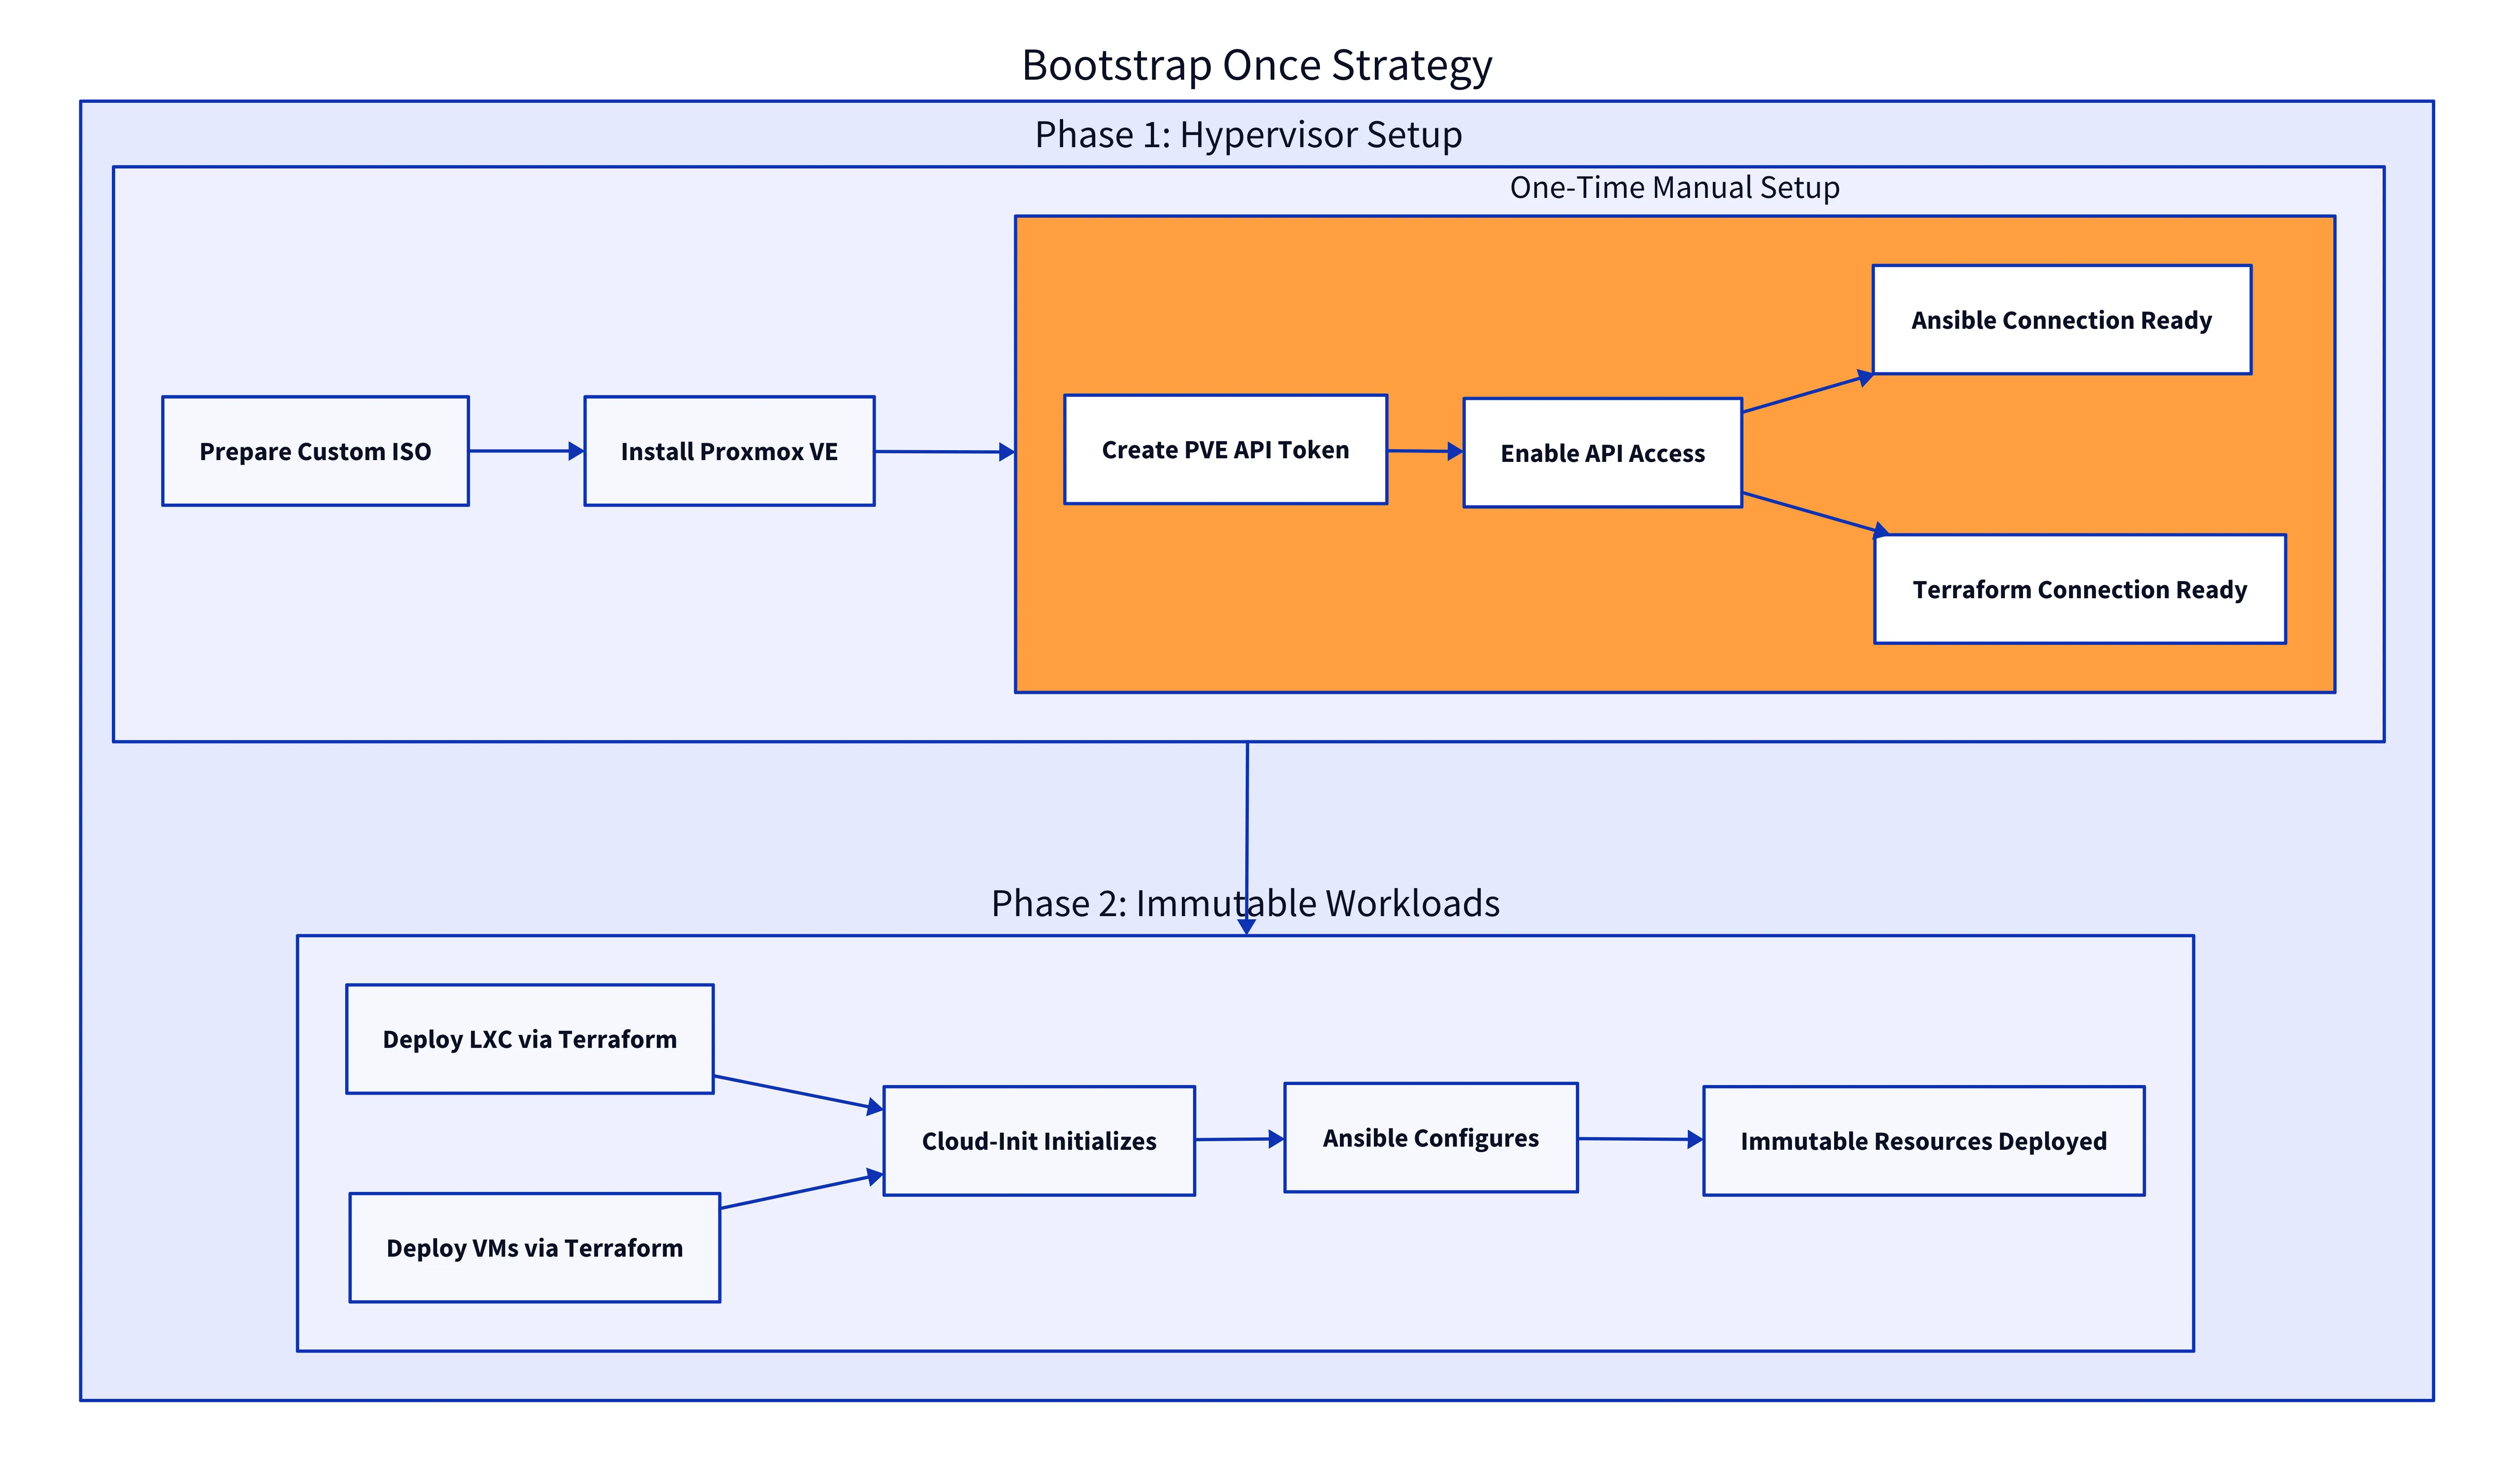
Bootstrap Once Strategy
The Bootstrap Once Strategy applies to the Proxmox Hypervisor itself. By using a custom-built ISO, the physical server is fully configured during the initial installation. It sets up networking, storage, user access, and SSH keys automatically. Once the OS is installed, the only manual step required is generating a Proxmox API token to authorize Terraform. After that, the system is immediately ready for automated provisioning.
Each Service
Pangolin Reverse Proxy Server
The secure gateway for the Public Playground. It handles all incoming public traffic, managing SSL certificates and routing requests to the appropriate services while blocking malicious actors.
For a deep dive into its architecture and security features, check out the dedicated post: Pangolin Reverse Proxy Server
Public Playground Server
A publicly accessible VM for hosting experimental projects and demos.
Services:
| Newt | A client service that securely connects to the Pangolin central controller. |
| Yoroshiku | Health check application. |
| Caddy | Reverse proxy handling public traffic routed via Pangolin. |
Security:
| Pangolin Protection | Public access is strictly controlled by the Pangolin Reverse Proxy, which handles authentication and traffic filtering before it ever reaches this server. |
| Wireguard | Internal communication between Newt and Pangolin is encrypted over a Wireguard tunnel, ensuring no exposed ports on the public internet. |
Private Playground Server
An internal development environment for testing services or personal projects.
Services:
| Yoroshiku | Health check application. |
| Caddy | Internal reverse proxy. |
Access:
| Tailscale VPN | This server has NO public ingress. It is only accessible to devices authenticated on my private Tailscale network, making it invisible to the public internet. |
Media Server
A dedicated VM for media streaming.
- Software: Jellyfin (Hardware Transcoding enabled via Intel QuickSync).
- Storage: Mounts media library from the Media File Server.
Media File Server
A lightweight LXC container serving as a NAS for media files.
- Protocol: SMB/CIFS (Samba) for broad compatibility with clients.
- Configuration: Managed via Ansible to ensure consistent permissions and shares.
Homelab Repository Directory Structure
The project is organized as a monorepo, with clear separation of concerns for each stage of the infrastructure lifecycle. From building the base OS image to deploying application containers, every component has its dedicated place.
homelab/
├── custom-iso/                 # Custom ISO builder
├── terraform/                  # Infrastructure as Code
├── ansible/                    # Configuration as Code
├── key-management/             # SSH key management
└── docker-services/            # Dockerized services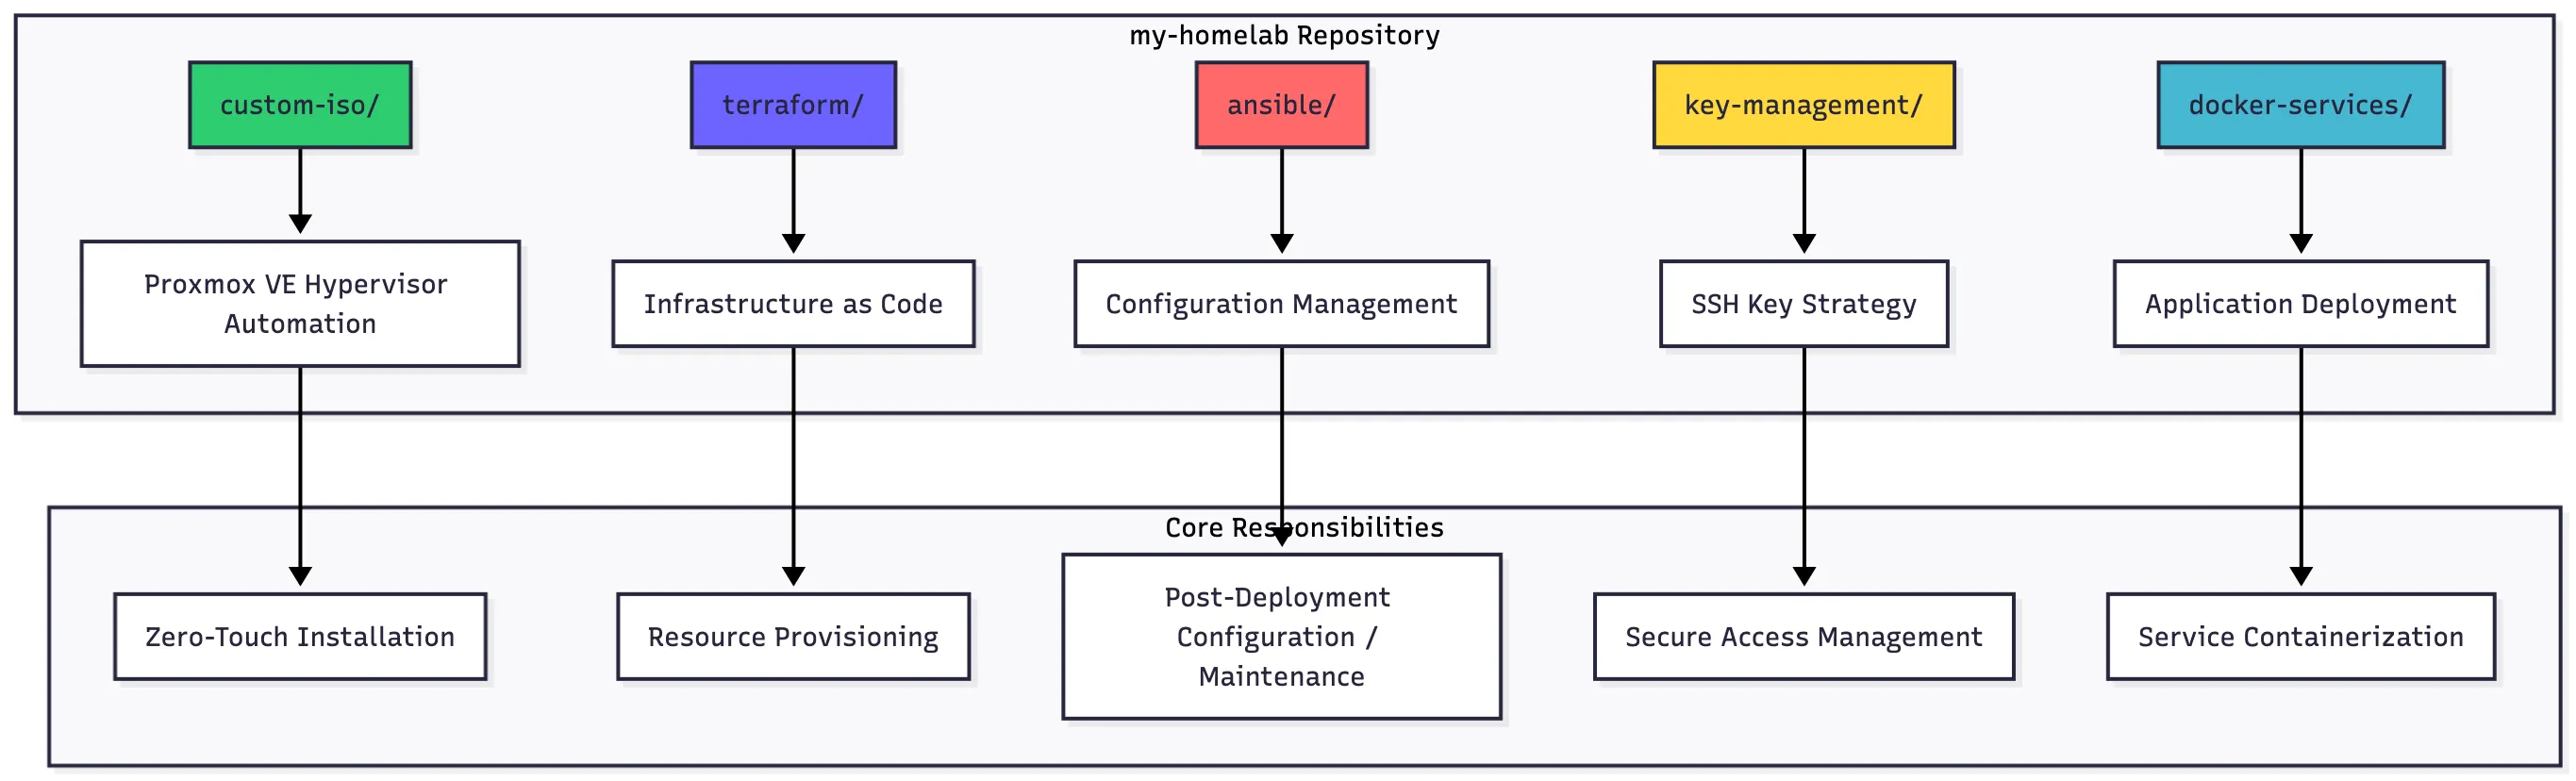
Custom ISO
Purpose: Create pre-configured Proxmox VE installation media
custom-iso/
├── Makefile                    # Build automation commands
├── config/                     # Configuration templates
│   ├── installation-config.example.sh
│   └── build-config.example.sh
├── scripts/                    # Build automation
│   ├── build-custom-iso.sh     # Main ISO builder
│   ├── generate-config.sh      # Config generator
│   └── validate-answer.sh      # Configuration validator
├── templates/                  # Answer file templates
│   └── auto.toml.template      # Proxmox answer file
└── lib/                        # Shared utilities
    └── common.sh               # Common functions
Key Responsibilities:
- Eliminate manual Proxmox VE installation
- Pre-configure network, storage, and users
- Generate automated installation answer files
- Create bootable ISO with embedded configuration
Terraform
Purpose: Declarative infrastructure management
terraform/
├── Makefile                    # Multi-service orchestration
├── services/                   # Service-based architecture
│   ├── iam/                    # Identity & Access Management
│   │   ├── main.tf             # User/role/token resources
│   │   └── iam.auto.tfvars     # IAM configuration
│   └── compute/                # Compute workloads
│       ├── main.tf             # VM/LXC resources
│       ├── ubuntu-vms.auto.tfvars
│       └── lxc-containers.auto.tfvars
├── modules/                    # Reusable components
│   ├── vm/                     # VM resource module
│   ├── lxc/                    # Container module
│   ├── vm-cloudinit/           # Cloud-init VM module
│   └── users/                  # User management module
└── scripts/                    # Utility scripts
    ├── create-data-disk.sh
    └── extract-secrets.sh
Key Responsibilities:
- Provision VMs and LXC containers
- Manage Proxmox users, roles, and API tokens
- Implement service-based architecture
- Maintain infrastructure state
- Enable reproducible deployments
Ansible
Purpose: Post-deployment configuration and management
ansible/
├── Makefile                    # Automation commands
├── playbooks/                  # Configuration playbooks
│   ├── hypervisors/            # Proxmox management
│   │   ├── configure-pve.yml   # Hypervisor config
│   │   ├── pve-post-install.yml
│   │   └── tailscale-install.yml
│   └── lxc/                    # Container setup
│       └── media-server-setup.yml
├── roles/                      # Reusable roles
│   ├── lxc_container/          # Container configuration
│   │   ├── tasks/main.yml      # Setup tasks
│   │   ├── templates/smb.conf.j2
│   │   └── files/mike-sudoers
│   └── pve_post_install/       # Hypervisor setup
├── inventory/                  # Target definitions
│   ├── hosts.yml               # Host inventory
│   └── group_vars/             # Group configurations
│       ├── all/common.yml
│       └── proxmox_hypervisors/main.yml
└── maintenance/               # Maintenance tools
    └── pve_post_install/
        └── compare-with-upstream.sh
Key Responsibilities:
- Configure hypervisor settings post-installation
- Set up LXC containers with applications
- Manage system packages and services
- Implement security configurations
- Maintain configuration consistency
Key Management
Purpose: Centralized SSH key management
key-management/
├── Makefile                    # Key management commands
├── infrastructure/             # Infrastructure keys
│   ├── id_rsa                  # Private key (gitignored)
│   └── id_rsa.pub              # Public key
├── admin/                      # Personal access keys
│   ├── id_rsa                  # Private key (gitignored)
│   └── id_rsa.pub              # Public key
├── scripts/                    # Management scripts
│   ├── setup.sh                # Key generation
│   ├── update-ansible-vault.sh
│   └── ssh-homelab.sh          # Connection helper
└── README.md                   # Documentation
Key Responsibilities:
- Generate and manage SSH key pairs
- Separate infrastructure and personal access
- Integrate with Terraform and Ansible
- Secure private key storage
- Enable automated authentication
Docker Services
Purpose: Containerized application deployment
docker-services/
├── jellyfin/                   # Media server
│   ├── compose.yml             # Docker Compose config
│   └── README.md
├── oci-reverse-proxy/          # Reverse proxy
│   └── pangolin/               # Proxy configuration
│       ├── docker-compose.yml
│       └── config/             # Traefik & Crowdsec
├── pve-110-private-playground/ # Development environment
│   ├── start-services.sh
│   ├── caddy/                  # Reverse proxy
│   └── yoroshiku/              # Health check app
└── pve-111-public-playground/  # Public services
    ├── start-services.sh
    ├── caddy/                  # Reverse proxy
    ├── newt/                   # API service
    └── yoroshiku/              # Health check app
Key Responsibilities:
- Define application containers
- Manage service dependencies
- Configure networking and volumes
- Implement service-specific settings
- Enable rapid application deployment
Key Workflows
Automated Deployment with GitHub Deploy Keys
To enable seamless updates for the Docker services, the infrastructure uses a “Pull” model where the VM itself fetches the latest code from GitHub. This is achieved securely using GitHub Deploy Keys.
During the VM’s provisioning phase (via Cloud-Init), it generates a unique SSH key pair. It then uses a temporary Personal Access Token to upload the public key to the GitHub repository as a “Deploy Key”. This key grants read-only access specifically to that repository, allowing the VM to git clone or git pull the latest Docker Compose configuration without exposing a master credential.
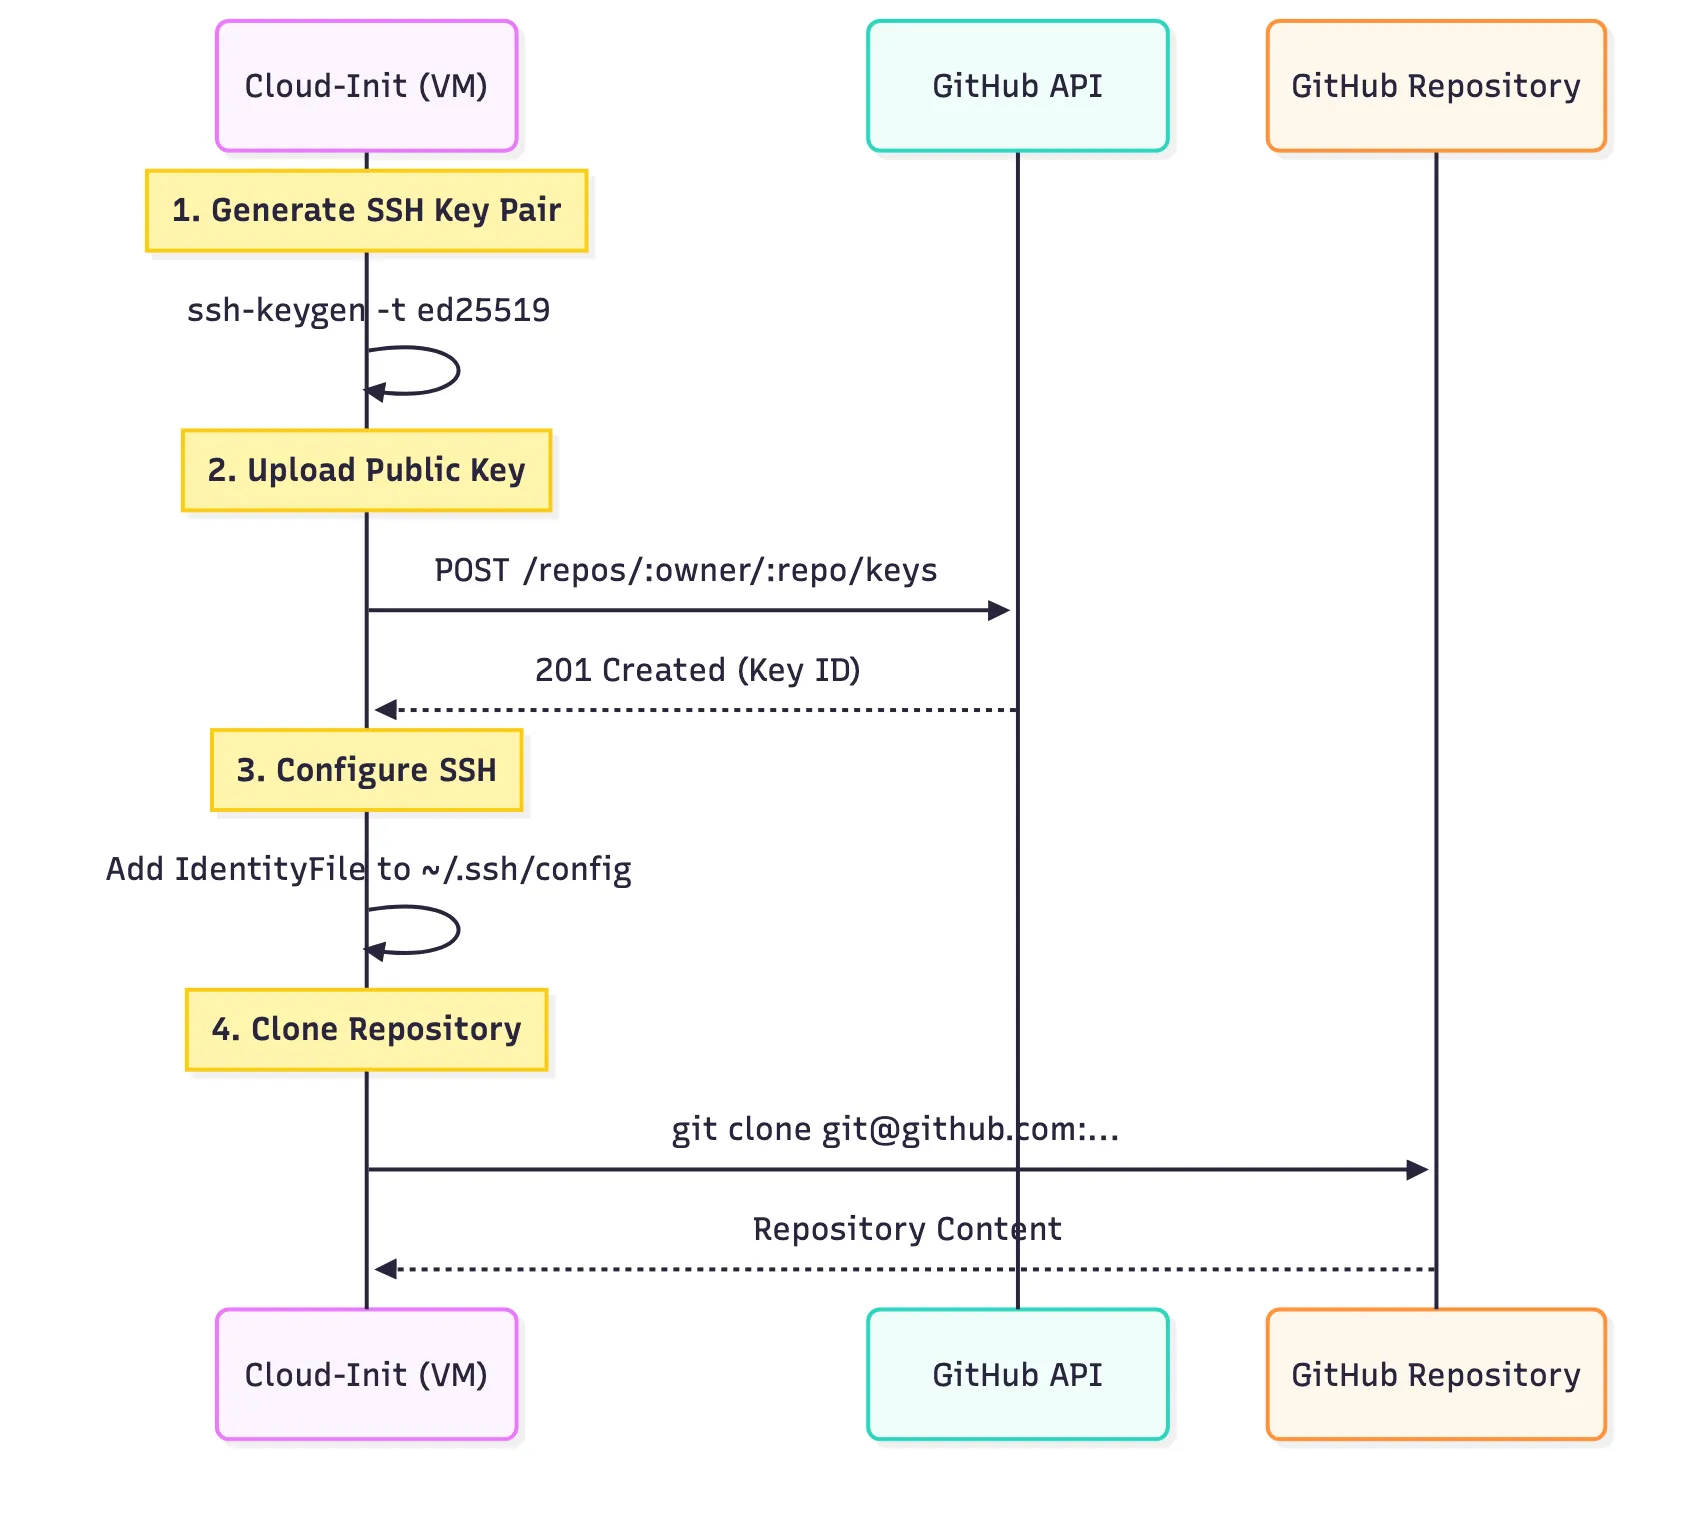
This process is fully automated within the Cloud-Init user data:
############ GitHub Setup ############
# Automated GitHub deploy key setup and repository cloning
if [ -n "${GITHUB_REPO_URL}" ]; then
  echo "Setting up GitHub repository access..."

  # 1. Create .ssh directory
  mkdir -p /home/${USER}/.ssh

  # 2. Generate SSH key on the VM (if it doesn't exist)
  if [ ! -f /home/${USER}/.ssh/github_deploy_key ]; then
    echo "Generating SSH key for GitHub..."
    ssh-keygen -t ed25519 -f /home/${USER}/.ssh/github_deploy_key -N "" -C "deploy-key"
    chmod 600 /home/${USER}/.ssh/github_deploy_key
    chmod 644 /home/${USER}/.ssh/github_deploy_key.pub
  fi

  # ... (SSH Config Setup) ...

  # 4. Create deploy key via GitHub API (if token is provided)
  if [ -n "${GITHUB_PERSONAL_TOKEN}" ] && [ -n "${GITHUB_REPO_OWNER}" ] && [ -n "${GITHUB_REPO_NAME}" ]; then
    echo "Creating GitHub deploy key via API..."
    PUB_KEY=$(cat /home/${USER}/.ssh/github_deploy_key.pub)

    # Try to create the deploy key (ignore if it already exists)
    curl -X POST \
      -H "Authorization: token ${GITHUB_PERSONAL_TOKEN}" \
      -H "Accept: application/vnd.github+json" \
      -H "X-GitHub-Api-Version: 2022-11-28" \
      "https://api.github.com/repos/${GITHUB_REPO_OWNER}/${GITHUB_REPO_NAME}/keys" \
      -d "{\"title\":\"deploy-key-$(date +%Y%m%d)\",\"key\":\"$PUB_KEY\",\"read_only\":false}" \
      || echo "Deploy key might already exist, continuing..."
  fi
fiterraform/.../public-playground-server.yamlterraform/services/compute/cloud-init/public-playground-server.yaml
SSH Key Lifecycle
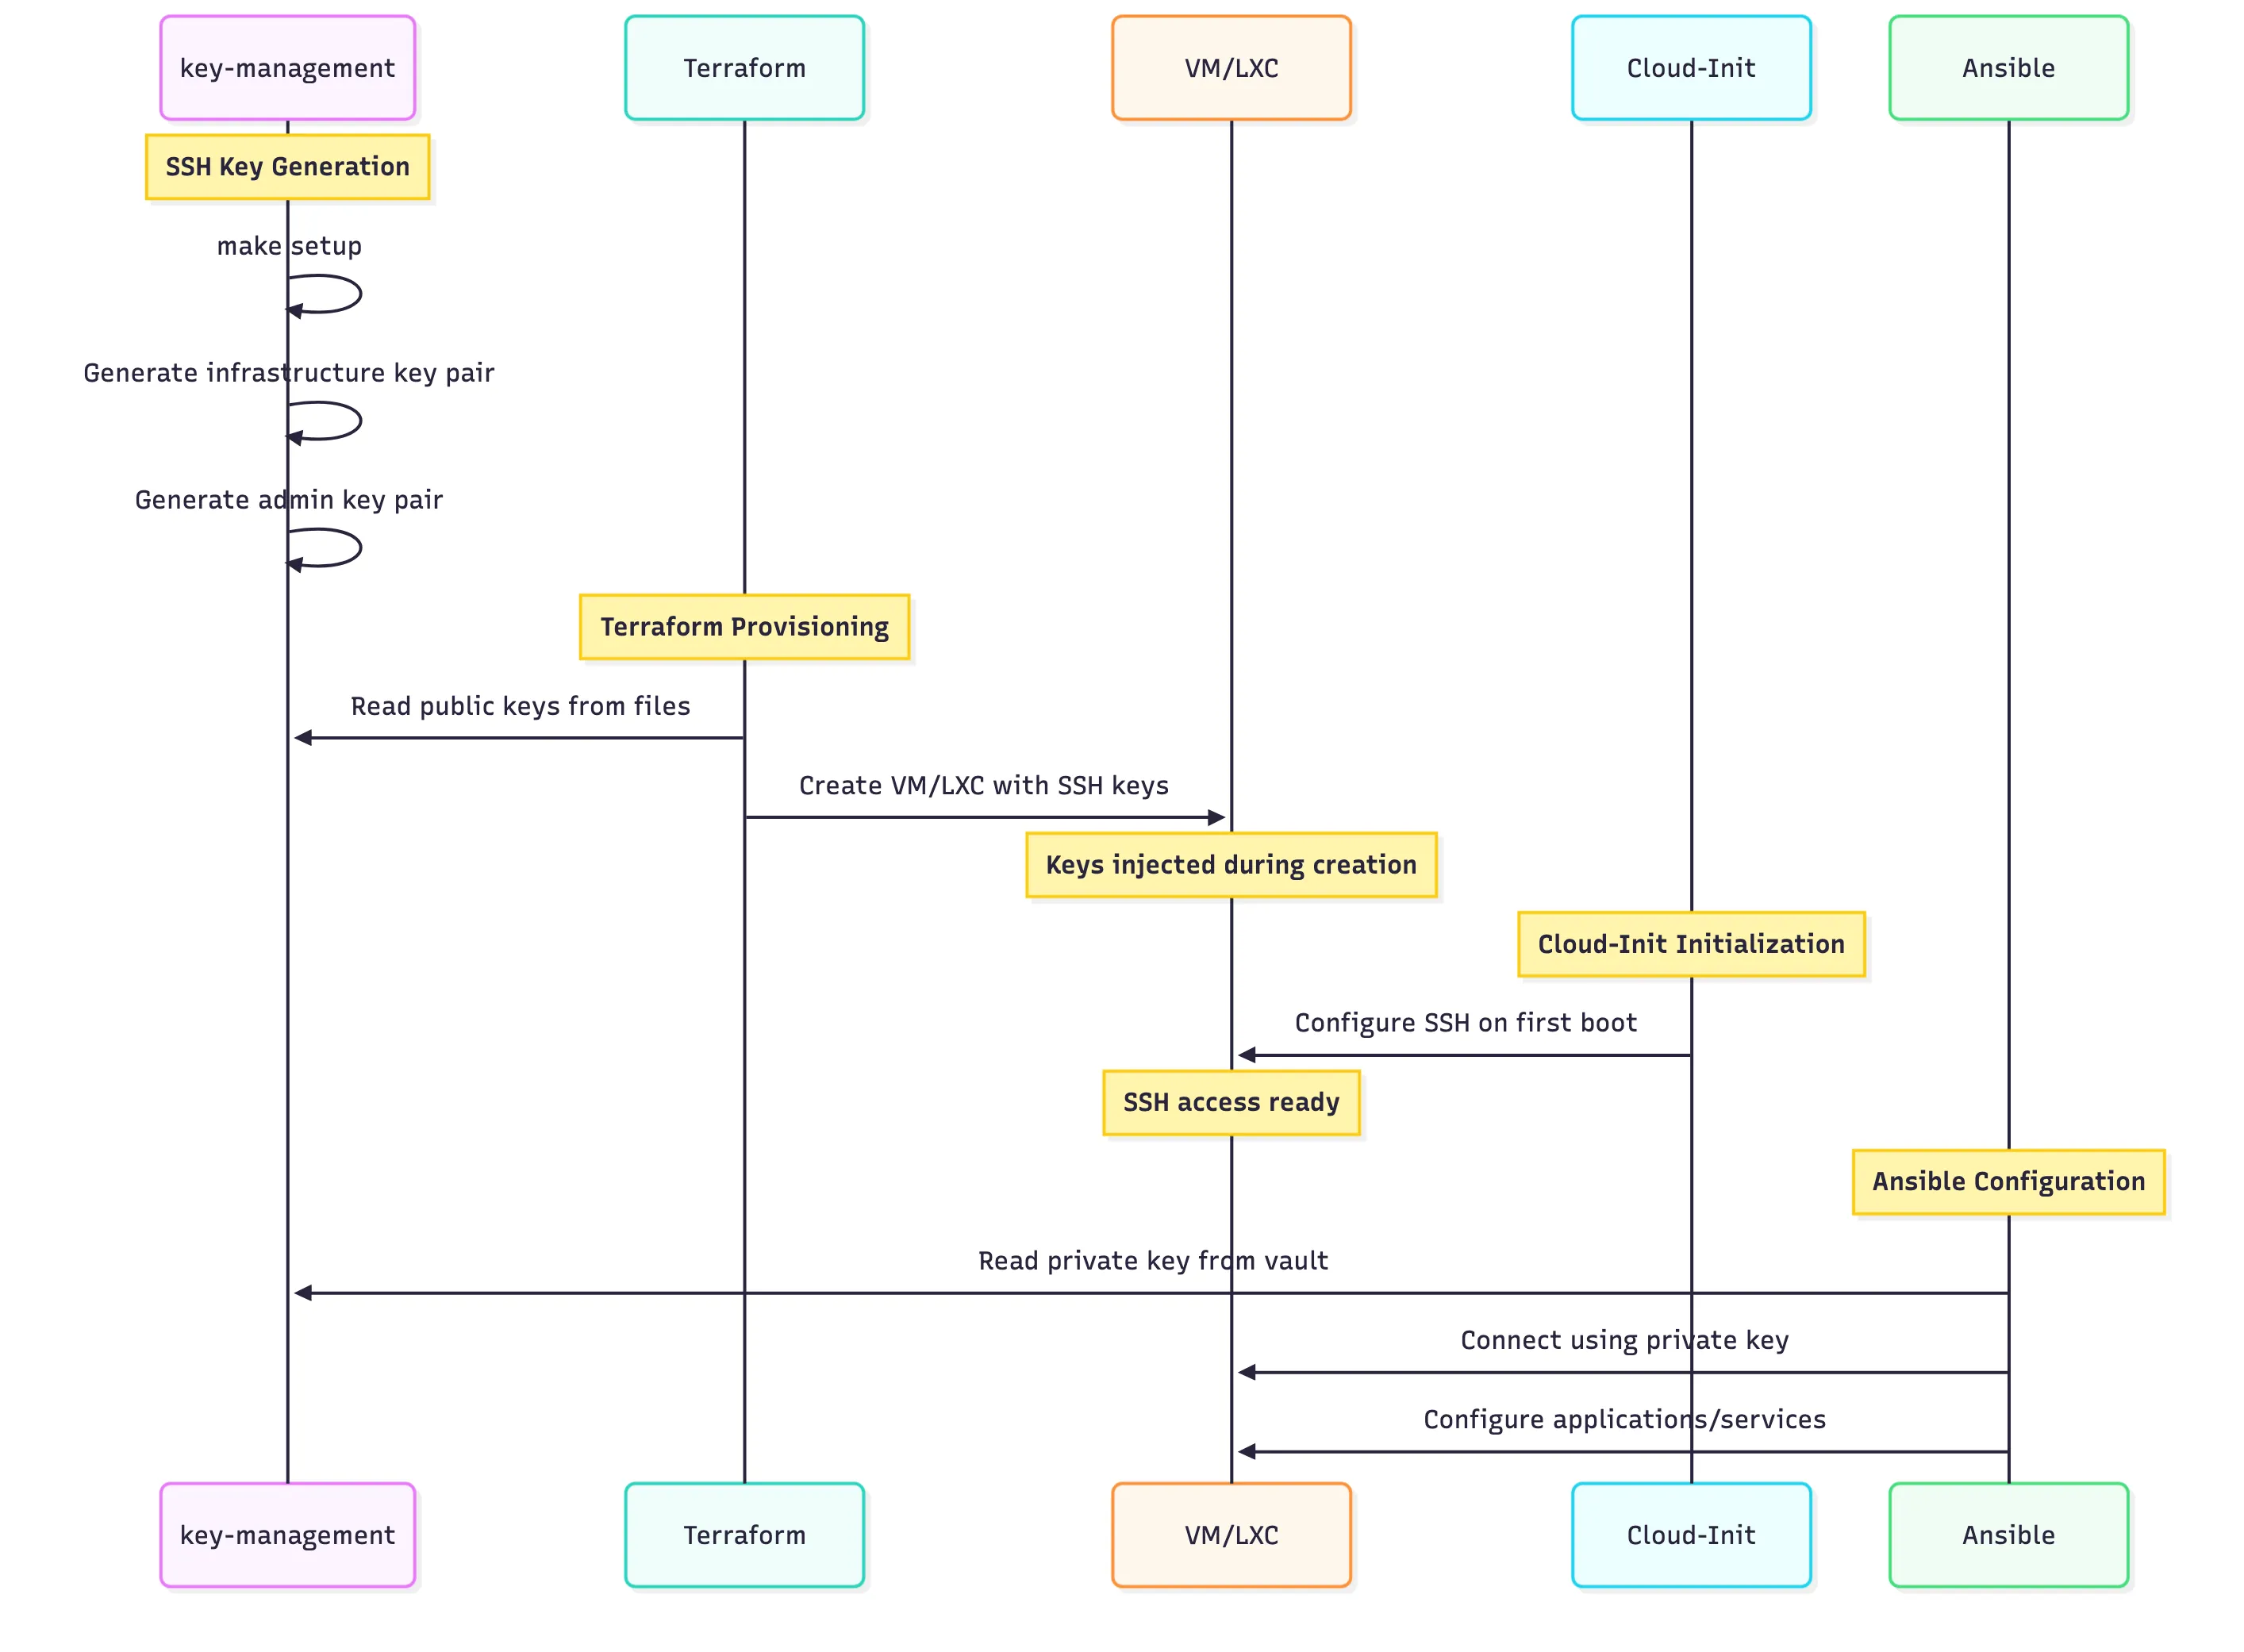
The SSH key management is designed to be secure and automated. We separate “Infrastructure Keys” (used by Terraform/Ansible) from “Admin Keys” (used by humans). These keys are injected into the VMs via Terraform variables.
variable "vm_provisioning_secrets" {
  description = "Per-VM secrets to merge with cloud_vms configuration (set in secrets.auto.tfvars)"
  type = map(object({
    cloudinit_password = optional(string, "")
    cloudinit_ssh_keys = optional(list(string), [])
    # ... other secrets
  }))
  sensitive = true
  default   = {}
}terraform/services/compute/variables.tfterraform/services/compute/variables.tf
These secrets are populated in a secrets.auto.tfvars file which is gitignored to prevent accidental exposure:
vm_provisioning_secrets = {
  "public-playground" = {
    cloudinit_password = "secure-password-here"
    cloudinit_ssh_keys = [
      "ssh-ed25519 AAAAC3NzaC... user@laptop",
      "ssh-ed25519 AAAAC3NzaC... ansible@controller"
    ]
  }
}terraform/services/compute/secrets.auto.tfvarsterraform/services/compute/secrets.auto.tfvars
The VM module logic ensures that every VM gets the correct set of keys. It concatenates the specific keys defined for that VM (from vm_provisioning_secrets) with the global “Infrastructure” and “Admin” keys. This guarantees that both the automation tools and the administrator always have access, regardless of the specific VM configuration.
# SSH keys are injected during VM creation
dynamic "initialization" {
  for_each = var.cloudinit_ssh_keys != null ? [true] : []
  content {
    user_account {
      # Combine multiple SSH keys
      keys = concat(
        var.cloudinit_ssh_keys,
        var.infrastructure_ssh_key != "" ? [var.infrastructure_ssh_key] : [],
        var.admin_ssh_key != "" ? [var.admin_ssh_key] : []
      )
    }
  }
}terraform/modules/vm/main.tfterraform/modules/vm/main.tf
For more advanced use cases where we use custom Cloud-Init scripts (like the Playground servers), we inject these keys directly into the user-data template. This allows the bash scripts inside the template to reference ${INFRASTRUCTURE_PUBLIC_KEY} and ${ADMIN_PUBLIC_KEY} as variables, keeping the scripts clean and generic.
# SSH keys embedded in cloud-init user data
resource "proxmox_virtual_environment_file" "cloud_init_user_data" {
  content_type = "snippets"
  source_raw {
    data = templatefile("${path.module}/${each.value.user_data_file}", {
      # SSH keys from key-management system
      INFRASTRUCTURE_PUBLIC_KEY = local.infrastructure_public_key
      ADMIN_PUBLIC_KEY          = local.admin_public_key
    })
  }
}terraform/services/compute/main.tfterraform/services/compute/main.tf
Finally, the Cloud-Init template applies these keys to the default user, disabling password authentication for enhanced security.
# User configuration
users:
  - name: <username>
    sudo: "ALL=(ALL) NOPASSWD:ALL"
    groups: sudo, users, admin, docker
    shell: /bin/bash
    lock_passwd: true # Disable password login - use SSH keys only
    ssh_authorized_keys:
      - "${INFRASTRUCTURE_PUBLIC_KEY}"
      - "${ADMIN_PUBLIC_KEY}"

# SSH hardening
ssh_pwauth: false # Disable password authentication
ssh_deletekeys: true # Remove default cloud keysterraform/.../public-playground-server.yamlterraform/services/compute/cloud-init/public-playground-server.yaml